Adding Photoshop-style layers to your XNA code
We recently added a ‘credits’ stage to our Lunar Panda Deluxe XNA game, and wanted a simple way of fading from one screen-sized bitmap to another. We would chain these bitmaps together so we could show several ‘stills’ from the game as a simple slideshow.
This prompted me to write our Layers class.
Simply put, this mimics the sort of basic image layering you would see in a paint package such as GIMP or Photoshop. The code supports nested layers with varying opacity, and is easily extended to support many more features.
Being able to nest layers is a very powerful feature. You could assign a game HUD as one (or more) layer, and have several layers to represent your actual game screen. In Lunar Panda this could be the ‘space’ background image, animated moons, Mr Panda, active obstacles, and the moon terrain itself.
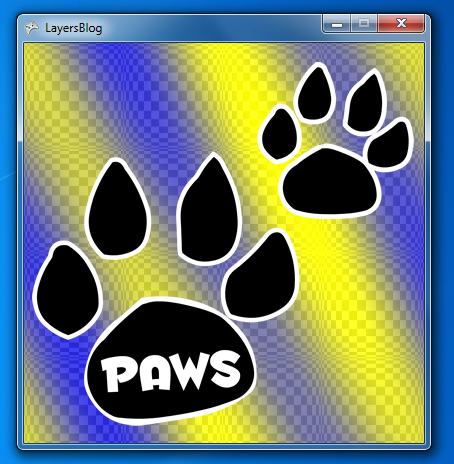
Here is a screenshot showing three separate layers superimposed on each other. One of them has a custom opacity applied:

The bottom-most layer is a blue/yellow plasma effect. Then comes a slightly transparent chequered pattern, then the ‘PAWS’ texture on top.
You can download the fully documented Layers code (including the example source and pre-built binary) from here:
DOWNLOAD SOURCE
In the example code we create the Layers object in the LoadContent() routine. First we load the Texture2D objects:
var patternLayer = new TextureLayer(Content.Load("pattern"));
var plasmaLayer = new TextureLayer(Content.Load("plasma"));
var pawsLayer = new TextureLayer(Content.Load("paws"));
Then tweak the opacity values:
// Tweak layer opacity.
plasmaLayer.Opacity = 0.9f;
...and finally add them to our Layers object:
// Create a Layers object, and define the order of the layers to display.

m_rootLayers = new Layers();
m_rootLayers.Add(patternLayer);
m_rootLayers.Add(plasmaLayer);
m_rootLayers.Add(pawsLayer);
Drawing the layers is now simple:
protected override void Draw(GameTime gameTime)
{
GraphicsDevice.Clear(Color.CornflowerBlue);
m_spriteBatch.Begin();
m_rootLayers.Draw(m_spriteBatch);
m_spriteBatch.End(); base.Draw(gameTime);
}
In a future post I’ll show how to extend this code to animate the opacity values over time, allow layers to be used as image masks, and support parallax scrolling.

